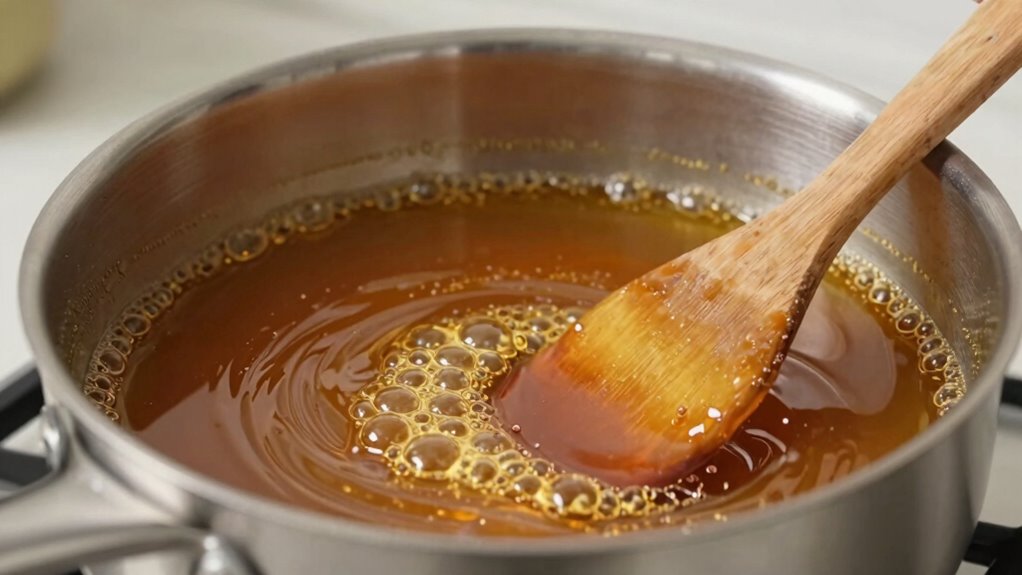

To master caramel without a thermometer, focus on color cues rather than temperature. As you melt sugar over medium heat, watch for a subtle change from clear to pale yellow, then to a warm amber hue. When the color deepens quickly and reaches that rich, golden-brown shade, remove the pan immediately. Timing and close observation are key—if you stay alert to these visual signs, you’ll consistently make perfect caramel. Keep watching, and you’ll discover all the tips to get it just right.
Key Takeaways
- Rely on visual color changes, from pale yellow to deep amber, as the main indicator for caramel readiness.
- Use medium heat and stir gently to ensure even melting and prevent burning.
- Watch for a warm amber hue—the color deepens quickly once achieved—then remove immediately.
- Avoid overcooking by acting promptly once the caramel reaches the desired shade.
- Practice and observe color cues regularly to build confidence without needing a thermometer.

Ever wondered how to make perfect caramel without a thermometer? It’s easier than you might think, especially when you learn to rely on your senses instead of a gadget. The key is understanding how sugar melting and color monitoring work together to guide you through the process. As you heat your sugar, keep a close eye on its transformation. When the sugar starts melting, it turns from a clear, syrupy liquid into a golden hue. This initial melting stage is subtle, so stay attentive. Once the sugar melts completely, it will begin to change color gradually.
Color monitoring is your best friend here. Instead of waiting for a specific temperature, watch how the sugar’s hue deepens. It begins as a light amber, then develops into a richer, darker shade. You want to pay close attention as it shifts from a pale yellow to a deep amber or even a light reddish-brown. The moment it hits that perfect shade, you need to act fast. Overcooking can lead to bitter, burnt caramel, so knowing when to pull it off the heat is vital. When the color matches the shade you’re aiming for—usually a warm amber—you should remove the pan immediately. Remember, the color intensifies quickly, so don’t get distracted once it’s nearing your target hue.
Another tip is to keep the pan at medium heat; too high, and the sugar will cook unevenly or burn before reaching the right color. Stir gently and constantly during the melting phase to guarantee even heat distribution. As the sugar melts, it will begin to shimmer and bubble; this is normal, but keep a steady hand. The main focus should be on the color, not the bubbling, as the latter can be deceiving if you’re not paying close attention. Once you’ve achieved the desired hue, remove the pan from the heat promptly, and proceed with your recipe.
A helpful approach is to familiarize yourself with the color cues that indicate the perfect caramel stage, which can boost your confidence in the process. It’s a skill that takes practice, but with patience and sharp observation, you’ll be able to make perfect caramel every time. The beauty of this method is that it bypasses the need for an exact temperature reading, relying instead on your eye for color and your understanding of how sugar melting progresses. Over time, you’ll develop an intuitive sense for when your caramel hits that just-right shade, making your desserts even more satisfying and professional-looking.

Digital Candy Thermometer with Pot Clip, 10" Long Stainless Steel Probe, Instant Read Kitchen Thermometer for Cooking, Baking, and Candy Making
Pot Clip Design for Safer Operation: This candy thermometer digital with clip can be fixed to the pot…
As an affiliate, we earn on qualifying purchases.
As an affiliate, we earn on qualifying purchases.
Frequently Asked Questions
Can I Make Caramel Without Any Visual Cues?
You can’t reliably make caramel without visual cues because sugar crystallization and flavor development depend on color changes. As you heat the sugar, watch for a deep amber hue to guarantee proper caramelization. Without these cues, you risk overcooking or undercooking, which affects texture and taste. Relying solely on visual signals helps you achieve the perfect caramel by monitoring its transformation through color, ensuring ideal flavor and consistency.
How Do I Prevent Burning When Using the Color Cue Method?
Think of your caramel as a delicate dance, where sugar crystallization is the partner you must guide carefully. To prevent burning, watch for consistent caramel color and stir gently to maintain even heat. Keep the heat medium-low, and remove from heat as soon as you see the right color to avoid overcooking. This helps you achieve the perfect caramel consistency without risking a burnt flavor.
Is This Method Suitable for All Types of Sugar?
Yes, this method works for most sugar varieties like white, brown, and raw sugar. However, you need to make temperature adjustments based on the sugar type because different sugars caramelize at different temperatures. For example, brown sugar might need a slightly lower heat than white sugar. Keep a close eye on the color, and adjust your heat accordingly to prevent burning and achieve perfect caramel every time.
How Long Does It Typically Take to Reach the Right Color?
It usually takes about 8 to 12 minutes for your sugar to reach the right caramel color, depending on the sugar type you use. Keep an eye on the color, which deepens from golden to amber as you stir. Different sugar types, like white or brown, may caramelize at slightly different rates, but watching the color cues helps you achieve perfect caramel without a thermometer.
Can I Store Caramel Made With This Technique?
Yes, you can store caramel made with this technique. Just make certain it cools completely in an airtight container to prevent sugar crystallization. Proper storage helps maintain the caramel’s smooth texture and prevents it from becoming hard or sticky. Keep it at room temperature for soft caramel or refrigerate for longer storage. Remember, the key to preserving caramel’s ideal texture is avoiding moisture and temperature fluctuations.

The Weed Gummies Cookbook: Recipes for Cannabis Candies, THC and CBD Edibles, and More (Guides to Psychedelics & More)
As an affiliate, we earn on qualifying purchases.
As an affiliate, we earn on qualifying purchases.
Conclusion
Now that you’ve learned how to make caramel without a thermometer, you’re equipped to create perfect, golden treats using just color cues. Did you know that as the sugar caramelizes, it undergoes over 20 chemical changes, each affecting its hue? With your new eye for color, you can confidently avoid burnt or undercooked caramel. Next time, trust your senses—you’ll be surprised how a simple color shift can lead to caramel perfection every time.

SENSARTE Nonstick Saucepan with Lid, 1.5 Quarts Small Pot with Swiss Granite Coating, Stay-cool Handle, Multipurpose Handy Sauce Pot Small Kitchen Cooking Pot, Induction Comptable, PFOA Free
Swiss Non-Stick Coating – Swiss ILAG nonstick granite coating, SGS approved. PFOA free, smokeless, safe & healthy. Cooking…
As an affiliate, we earn on qualifying purchases.
As an affiliate, we earn on qualifying purchases.

Norpro Sugar, Spice Sifter Spoon, 3.75in/12cm, as shown
Measures: 4.75" X 2" X 1"/ 12cm x 5cm x 2.5cm
As an affiliate, we earn on qualifying purchases.
As an affiliate, we earn on qualifying purchases.