
To make arepas puff every time, make certain your dough is finely ground and mixed with warm water, salt, and a bit of oil until soft but not sticky. Let it rest for a few minutes to fully absorb moisture, then shape them about half an inch thick. Use a hot skillet over medium heat, and cook until the outside is crispy and golden, flipping carefully. Keep experimenting with dough consistency and heat, and you’ll master perfect puffing each time. Stay tuned for more tips to perfect your arepas.
Key Takeaways
- Use finely ground cornmeal and mix with warm water, salt, and oil until the dough is soft but not sticky.
- Allow the dough to rest for a few minutes to fully absorb moisture and improve puffing.
- Keep arepas about half an inch thick and cook on medium heat for even puffing and crispness.
- Ensure uniform dough thickness and proper resting to promote consistent puffing and texture.
- Adjust heat or dough consistency if arepas do not puff, and flip carefully for a golden, puffy crust.
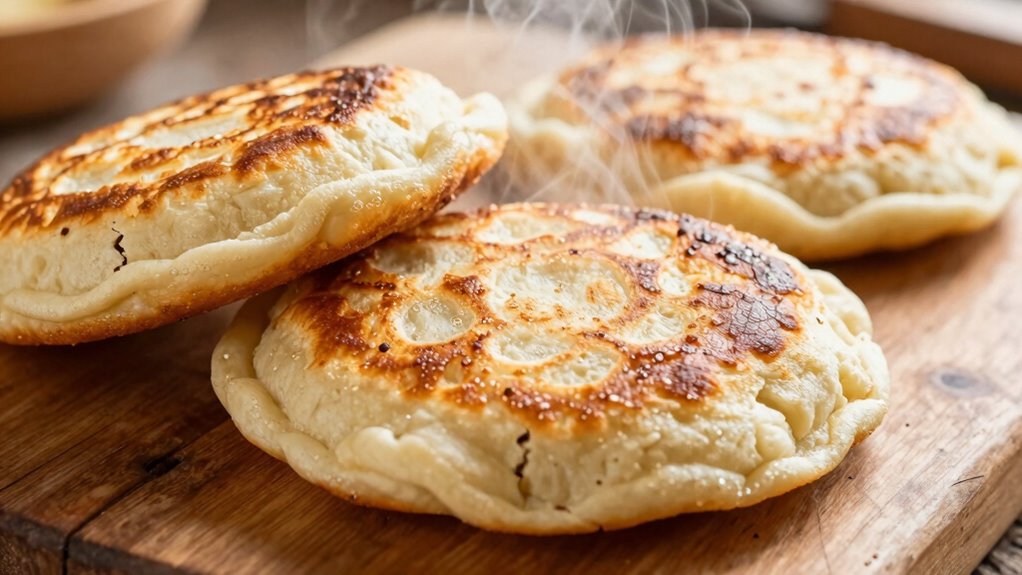
Have you ever considered starting your day with a delicious, versatile breakfast? Arepas are perfect for that—crispy on the outside, soft and tender inside, and incredibly customizable. When making arepas for breakfast, the key to getting them to puff every time lies in your dough. The right dough consistency, proper mixing, and cooking technique can make all the difference. First, ensure your cornmeal is finely ground; coarse flour can lead to uneven puffing. Mix the cornmeal with warm water, a pinch of salt, and a little bit of oil until the dough is soft but not sticky. Let it rest for a few minutes; this allows the moisture to absorb fully, resulting in a better texture. When shaping your arepas, keep them uniform—about half an inch thick—to promote even puffing. As you cook, make sure your skillet or griddle is hot enough—around medium heat—so the outside crisps up quickly, trapping steam inside, which causes the puff. Flip them carefully; they should develop a golden crust and puff up beautifully. If they don’t puff, don’t worry—adjusting the dough or heat can fix that for next time. Paying attention to dough preparation techniques can greatly improve your results and ensure consistent puffing. Exploring arepas variations can add excitement to your breakfast routine. For instance, you might try cheese-stuffed arepas, filled with gooey cheese or your favorite types of cheese blends. Other options include adding black beans, scrambled eggs, or avocado slices for a hearty twist. You can also incorporate herbs or spices into the dough for extra flavor. Pairing your arepas with the right breakfast beverage is essential, too. A hot cup of coffee or a glass of freshly squeezed juice complements the mild, comforting flavors perfectly. For a more indulgent start, consider pairing them with a rich hot chocolate or a flavored tea. The versatility of arepas makes them suitable for various breakfast beverage pairings, whether you prefer a traditional Colombian hot chocolate or a revitalizing fruit smoothie.
Frequently Asked Questions
Can I Use Gluten-Free Flour for Making Arepas?
Yes, you can use gluten-free flour for making arepas. To guarantee your dough binds well with gluten-free alternatives, consider adding a bit of xanthan gum or psyllium husk. These dough binding techniques help mimic traditional gluten’s elasticity, making your arepas puff up beautifully and hold together. Experiment with different gluten-free flours like almond or rice flour, but always adjust with binders to achieve the right dough consistency.
How Do I Prevent Arepas From Sticking to the Pan?
To prevent arepas from sticking, use a non-stick pan or make sure your pan is well-seasoned. Apply proper oil usage by lightly greasing the pan with a small amount of oil before cooking. Preheat the pan thoroughly, so the arepas sizzle upon contact. Avoid overcrowding, and flip them carefully once the bottom is golden. These non-stick pan techniques and proper oil usage help you achieve perfectly cooked, puffed arepas every time.
What’s the Best Way to Store Leftover Arepas?
For leftover arepas storage, let them cool completely before wrapping them tightly in plastic or foil. Keep them in the refrigerator for up to three days. When reheating, use a toaster oven or skillet to restore their crispness, adding a little oil if needed. Avoid microwaving for too long, as it can make arepas soggy. These reheating tips help you enjoy your arepas just as fresh as when first made.
Can I Make Arepas Ahead of Time?
Yes, you can make arepas ahead of time for meal prep. To do this, prepare the dough and shape the arepas, then store them in an airtight container or wrap them tightly with plastic wrap. Keep them refrigerated for up to 24 hours. When you’re ready to eat, just reheat them on a skillet or in the microwave. Follow these storage tips to guarantee they stay fresh and delicious.
Are There Vegan Options for Traditional Arepa Fillings?
They say, “where there’s a will, there’s a way,” and that’s true for vegan arepa fillings. You can easily swap traditional ingredients for plant-based options like vegan cheese, seasoned beans, avocado, or grilled vegetables. These fillings add flavor and texture while keeping your arepas completely vegan. Feel free to get creative with your favorite plant-based fillings, ensuring every bite is delicious and satisfying!
Conclusion
Now that you know the secret dough tips, your arepas will always puff perfectly. But here’s the thing—you’ve just scratched the surface. The real magic happens when you start experimenting, adding unexpected ingredients, or tweaking techniques. Are you ready to discover what else your dough can do? The journey to perfect arepas isn’t over; it’s just beginning. Keep your eyes open—you never know what delicious surprises await just around the corner.