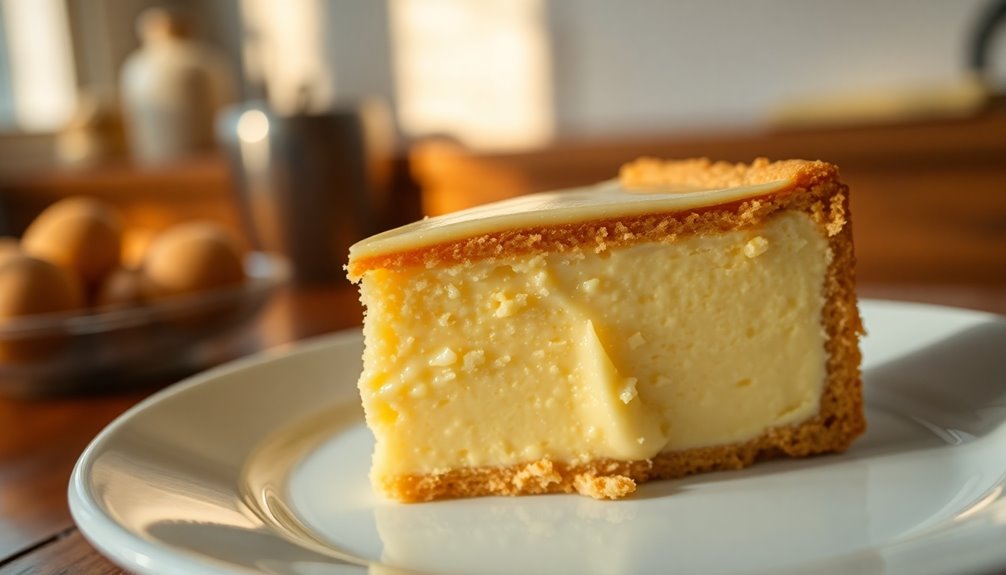
Custard and cracker cake is a delightful dessert that layers creamy vanilla pudding with crunchy saltine crackers. This nostalgic treat's simplicity shines through, making it perfect for gatherings or just satisfying your sweet tooth at home. You'll want to let it chill for at least 24 hours to maximize flavor blending. Feel free to experiment with different puddings or add fresh fruit for an extra twist. There's so much more to discover about this classic dessert!
History

The custard and cracker cake has an intriguing history that reflects the evolution of American baking. This delicious dessert emerged in the early 20th century, showcasing layers of homemade custard and graham crackers, which were originally marketed as a health food.
As convenience became key, recipes featuring vanilla pudding and instant mixes gained popularity in the mid-20th century. You'll find that many of these layered cracker desserts appear in community cookbooks, celebrating local traditions and family gatherings.
The use of cornstarch in the custard filling creates a creamy texture without extensive baking, emphasizing simplicity and accessibility. Over the decades, this cake has transformed into a beloved staple in American homes, embodying nostalgia and comfort in each bite.

Jell-O Cook & Serve Pudding & Pie Filling Mix, Vanilla, 4.6 oz Box
- Product Size: 4.6 oz box
- Versatile Use: Ideal for pudding and pie filling
- Flavor: Vanilla artificial flavor
As an affiliate, we earn on qualifying purchases.
As an affiliate, we earn on qualifying purchases.
Recipe

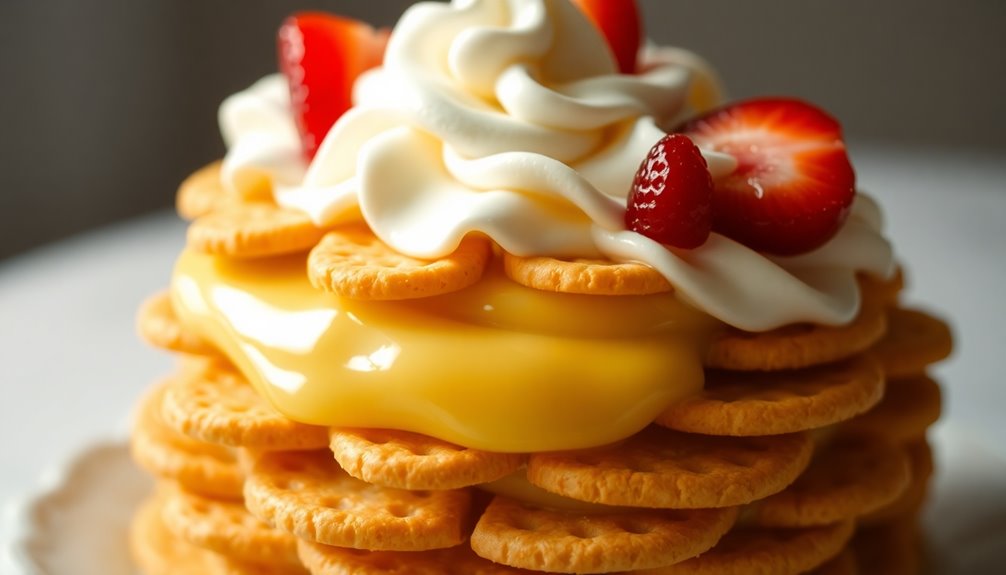
The Custard and Cracker Cake is a delightful and easy-to-make dessert that combines layers of creamy vanilla pudding and light Cool Whip with the crunch of unsalted saltine crackers. This nostalgic treat is perfect for gatherings, potlucks, or simply as a sweet indulgence at home. The combination of textures and flavors makes it a favorite among both kids and adults alike.
To begin, you'll need to prepare the vanilla pudding, which forms the foundation of this cake. By cooking Jell-O Cook & Serve Vanilla Pudding with milk, you'll create a luscious filling that contrasts beautifully with the crispy crackers. Once assembled and allowed to chill, the flavors meld together, making each bite a delightful experience.
Ingredients:
- 2 packages Jell-O Cook & Serve Vanilla Pudding
- 6 cups milk
- 1 tub Cool Whip (8 oz)
- Unsalted saltine crackers
- Fresh fruit (strawberries, blueberries, peaches) for topping (optional)
Instructions:
In a large saucepan, cook the two packages of Jell-O Cook & Serve Vanilla Pudding with six cups of milk over medium heat, stirring frequently until it thickens.
Once cooked, allow the pudding to cool completely. In a 9×13 dish, line the bottom with a layer of saltine crackers, then spread a layer of cooled pudding over the crackers followed by a layer of Cool Whip.
Repeat this process to create three layers, finishing with Cool Whip on top. Cover the dish with plastic wrap and refrigerate for 24 hours to let the flavors develop and the texture set.
Extra Tips:
For optimal results, be sure to let the pudding cool completely before layering; this will prevent the crackers from becoming too soggy.
If you want to add a fun twist, consider incorporating different flavored puddings or adding crushed fruit between the layers.
When ready to serve, fresh fruit not only adds a pop of color but also enhances the flavor profile, making it even more appealing. Enjoy your delicious Custard and Cracker Cake!
Cooking Steps

To make your Custard and Cracker Cake, start by preparing the custard mixture.
Next, layer the crackers in your baking dish and spread the custard over them.
Once you've chilled it until set, finish off with a generous topping of whipped cream.
Step 1. Prepare Custard Mixture First

Whisk together 2 packages of Jell-O Cook & Serve Vanilla Pudding with 6 cups of milk in a saucepan over medium heat until it thickens according to package instructions.
Once the mixture starts bubbling, lower the heat and continue to whisk for an additional minute for a smooth consistency.
After cooking, remove the saucepan from heat and cover the pudding with plastic wrap directly on the surface to prevent a skin from forming.
Let the vanilla custard chill completely in the refrigerator for at least 2 hours.
This chilled pudding is essential for your cake assembly, where you'll layer it with unsalted soda crackers.
The combination enhances the overall texture and flavor, making your dessert irresistible.
Step 2. Layer Crackers in Dish

After your vanilla custard has chilled, it's time to start layering the crackers in your baking dish.
Begin by lining the bottom of a 9 x 13 glass baking dish with about 76 unsalted soda crackers, using roughly two sleeves to create a sturdy first layer.
Next, spread a thin layer of prepared vanilla pudding evenly over the crackers.
Follow this with a layer of Cool Whip, gently spreading it to preserve the cracker layer underneath.
Repeat this process two more times, alternating layers of crackers, vanilla pudding, and Cool Whip.
Make sure to finish with a Cool Whip layer on top.
Once completed, cover the baking dish and place it in the refrigerator to chill and set.
Step 3. Spread Custard Over Crackers
Once your vanilla pudding is completely chilled, you're ready to spread it over the cracker layer.
Begin by taking a large bowl and gently spoon the custard layer onto the unsalted soda crackers, ensuring you cover them fully for even flavor. This is the first step in making the cake.
After the pudding, add a thin layer of whipped cream on top, smoothing it out for a delicate texture.
Now, repeat this process two more times, alternating between the custard and whipped cream layers.
Finish with a final layer of whipped cream.
Once you've assembled all the layers, pop the dish in the fridge overnight. This allows the flavors to meld beautifully and the tea biscuits to soften.
Enjoy the deliciousness!
Step 4. Chill Until Set

To ensure your custard and cracker cake sets perfectly, refrigerate the assembled layers for at least 24 hours. This chilling time allows the flavors to meld beautifully while the layers of biscuits soften, creating a delightful treat.
Make sure the custard is completely cooled before layering it over the crackers to prevent soggy layers. Once assembled, cover with plastic wrap to protect it from any odors in your refrigerator. This step is crucial for maintaining the dessert's integrity.
The chilling process is essential for achieving that creamy texture you're aiming for in your custard cake. After the waiting period, slice and serve your cake to enjoy its delightful layers and flavors at their best.
Step 5. Top With Whipped Cream

Now it's time to top your custard and cracker cake with a luscious layer of whipped cream.
After chilling the cake for 24 hours, whip together heavy cream, confectioners sugar, and a splash of vanilla until you achieve a light and fluffy texture.
For the best results, choose non-ultra-pasteurized cream, as it whips beautifully and holds its shape.
Spread the whipped cream in a thick layer over the chilled custard and chocolate layers, ensuring it complements the rich flavors beneath.
To elevate your delicious dessert, consider garnishing with fresh fruit or chocolate shavings before serving.
This final touch not only adds flavor but also enhances the visual appeal of your masterpiece.
Enjoy every bite!
Final Thoughts
As you consider making the custard and cracker cake, remember that its simplicity is part of its charm.
This easy and delicious dessert, layered in a glass baking dish, combines the subtle crunch of digestive biscuits with the creamy goodness of vanilla pudding. The layers of custard on top and Cool Whip create a delightful flavor and texture contrast that's hard to resist.
Chilling the cake for at least 24 hours allows the flavors to meld perfectly. For a fresh twist, add seasonal fruit pie on top just before serving.
Whether you stick with classic vanilla extract or experiment with lemon pudding, this dessert is sure to impress with its effortless elegance and delightful taste. Enjoy every bite!
Frequently Asked Questions
What Are the Three Types of Custards?
The three main types of custards you'll encounter are stirred custards, baked custards, and pastry cream.
Stirred custards, like crème anglaise, thicken on the stovetop while you constantly stir, resulting in a smooth sauce.
Baked custards, such as flan, are mixed and baked, giving them a firmer texture.
Pastry cream, used in desserts, thickens with cornstarch, creating a rich filling.
Each type can be flavored for added versatility in your culinary creations.
Can Custard Be Used in Cakes?
Yes, you can definitely use custard in cakes! It adds a rich, creamy texture and enhances the overall flavor.
When you incorporate custard into your cake recipes, it not only moistens the layers but also creates a delightful contrast with drier elements.
Just remember to chill your cake after baking to let the custard thicken and meld with the other ingredients for the best taste.
Experimenting with different flavors can also personalize your dessert!
Does Cake With Custard Filling Need to Be Refrigerated?
When it comes to cakes with custard filling, you've got to keep it cool, or it'll spoil faster than you can say "cake day!"
Yes, you need to refrigerate that cake to prevent spoilage since custard contains perishable ingredients like milk and eggs.
Store it in the fridge for 3-4 days to keep it fresh, and chill it for at least 4 hours before serving for the best flavor and texture.
Where Does Custard Cake Come From?
Custard cake has its roots in Bulgaria, where it's known as Biskvitena Torta.
You'll find that this traditional dessert features layers of creamy custard made from egg yolks, sugar, cornstarch, and milk.
Over the years, variations have appeared in different cultures, showcasing similar layered structures.
As you explore this delightful treat, you might also discover modern adaptations, including flavors like chocolate or fruit, all while honoring the classic custard base.