Vanilla meringue on aquafaba is a delicious, vegan-friendly dessert that lets you enjoy the classic airy texture without eggs. Just whip aquafaba until stiff peaks form, add sugar and vanilla, then bake until crispy. With simple ingredients and customizable flavors, you can create stunning meringues that fit any occasion. They're perfect as a snack or for fancy desserts. If you want to explore more about this delightful treat and its variations, there's plenty to discover!
History

Meringue has a rich history that dates back to at least 1691, when the term first appeared in French culinary texts. Traditionally, you'd whip up egg whites to create this delicate dessert, a staple in many kitchens. However, the culinary landscape shifted in the 21st century with the discovery of aquafaba as a viable vegan substitute. This plant-based innovation mimics the structure and stability of egg whites, making it a game-changer for those with dietary restrictions. Additionally, using essential oils in various dessert recipes has become a trend, enhancing flavors and promoting wellness. The popularity of healthy ingredients like aquafaba reflects a broader consumer interest in sustainable and ethical food practices.
Different types of meringue, like French, Swiss, and Italian, each showcase unique preparation methods, yet aquafaba has opened doors for creative twists while honoring traditional recipes. The discovery of aquafaba has not only transformed vegan baking but also sparked interest in exploring alternative ingredients for various recipes.
As an affiliate, we earn on qualifying purchases.
Recipe
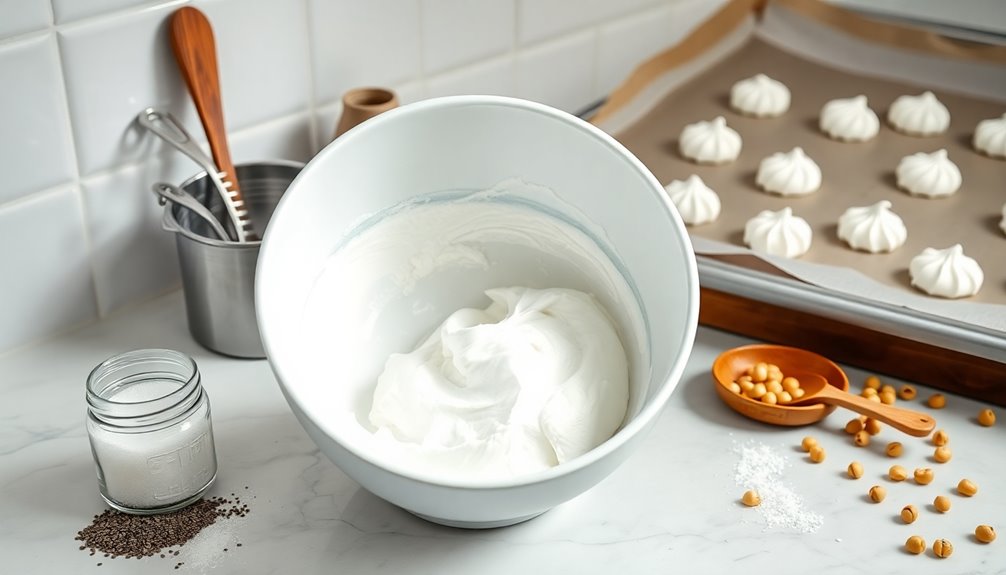
Making vanilla meringue using aquafaba is a delightful and vegan-friendly alternative to traditional meringue. Aquafaba, the liquid from canned chickpeas, can be whipped to create a light and airy texture that mimics egg whites, making it perfect for creating delicious meringues. This recipe isn't only simple but also allows for creativity with flavor variations, ensuring that you can enjoy this sweet treat in multiple ways. Additionally, incorporating ingredients like chia seeds can enhance the nutritional profile by providing essential nutrients that support overall wellness. Baked kale is also a fantastic source of nutrients that can complement your dessert.
Aquafaba meringue offers a light, vegan twist on a classic treat, perfect for creative flavor explorations.
To achieve the perfect meringue, you'll need to pay attention to the ingredients and the whipping process. The key is to ensure that the aquafaba is whipped until stiff peaks form, which provides the structure necessary for the meringues to hold their shape during baking. Once baked, these meringues will become crisp and ready to enjoy as a standalone snack or as an elegant addition to desserts.
Ingredients:
- 3/4 cup aquafaba
- 1/4 teaspoon cream of tartar
- 1/2 cup sugar
- 1 teaspoon vanilla extract
Cooking Instructions:
In a mixing bowl, combine 3/4 cup of aquafaba with 1/4 teaspoon of cream of tartar and begin whipping on high speed until the mixture becomes foamy.
Gradually add in 1/2 cup of sugar while continuing to whip, then add 1 teaspoon of vanilla extract.
Continue to whip until stiff peaks form, which should take about 5 minutes.
Once ready, pipe the meringue into quarter-sized rounds on parchment-lined baking sheets and bake at 200°F for approximately 1.5 hours, or until they're dry and crisp.
Allow the baked meringues to cool completely on wire racks before storing them in airtight containers.
Extra Tips:
When making meringues, it's essential to ensure that your mixing bowl and beaters are clean and free from any grease, as this can hinder the whipping process.
For added flavor, feel free to experiment by incorporating different extracts or powders, such as instant espresso for mocha meringues or dehydrated strawberry powder for a fruity twist.
Remember that the meringues will last up to one week in an airtight container, but they're best enjoyed fresh!
Cooking Steps

To start making your vanilla meringue, you'll need to preheat your oven to 200°F and line your baking sheets with parchment paper.
Next, whip the aquafaba with cream of tartar until it's foamy, then gradually add sugar and vanilla extract. Using a high pressure method can help achieve a fluffier texture in your meringue. Incorporating different materials can also enhance the aesthetic appeal of your dessert presentation.
Once you've got stiff peaks, pipe the meringue onto your prepared sheets and get ready to bake! This process is similar to achieving color accuracy in home cinema projectors, where the right techniques are essential for the best results.
Step 1. Preheat the Oven to 200°F
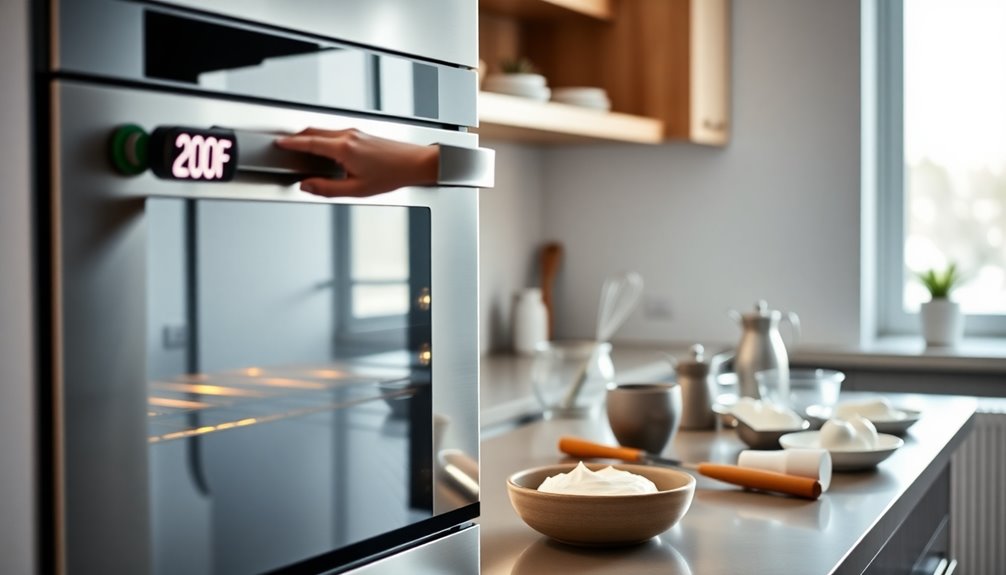
Preheating the oven to 200°F (93°C) is crucial for creating the perfect vanilla meringue. This low temperature ensures your meringues bake slowly, allowing them to dry out properly for that desirable crispy texture. Additionally, using a whistling kettle can help you reach this precise temperature efficiently.
Before you start, position your oven racks in the upper-middle and lower-middle sections for even heat distribution during baking. Line two half sheet pans with parchment paper to prevent sticking and make removal easy.
Maintaining this low heat is essential, as it prevents the meringues from browning, helping you achieve a beautiful white, airy appearance. Allow approximately 1.5 hours for baking, ensuring the meringues are completely dry and crisp throughout. Additionally, creating a calm environment in your kitchen can enhance your baking experience and promote mindfulness during the process.
Your patience will pay off with delightful results!
Step 2. Whip Aquafaba Until Stiff Peaks

With the oven set to the perfect temperature, it's time to whip the aquafaba to achieve those glorious stiff peaks.
Start by measuring 3/4 cup of aquafaba from a can of low-sodium chickpeas and pour it into your stand mixer. Add 1/4 teaspoon of cream of tartar to stabilize the mixture.
Mix on medium speed for about 2-3 minutes until it's foamy and airy. Gradually incorporate 1/2 cup of granulated sugar and 1 teaspoon of vanilla extract, ensuring the sugar dissolves completely.
Then, increase the speed to high and beat for about 5 minutes, until stiff peaks form. To test, turn the bowl upside down; if the meringue stays in place, you're ready for the next step in your vegan treat!
Step 3. Fold in Sugar Gradually

As you prepare to fold in the sugar, remember that doing this gradually is key to achieving a stable meringue.
Start adding the sugar one tablespoon at a time, ensuring each addition fully dissolves before the next. This method helps maintain the airy structure of the whipped aquafaba and enhances the meringue's overall stability.
You should add the sugar after whipping the aquafaba to soft peaks at medium speed, which typically takes about 2-3 minutes.
Once all the sugar is incorporated, increase your mixer's speed to high and beat until you achieve stiff peaks, usually in another 5 minutes.
The final texture should be glossy and thick, creating the perfect base for your fluffy vanilla meringues.
Step 4. Add Vanilla Extract Gently
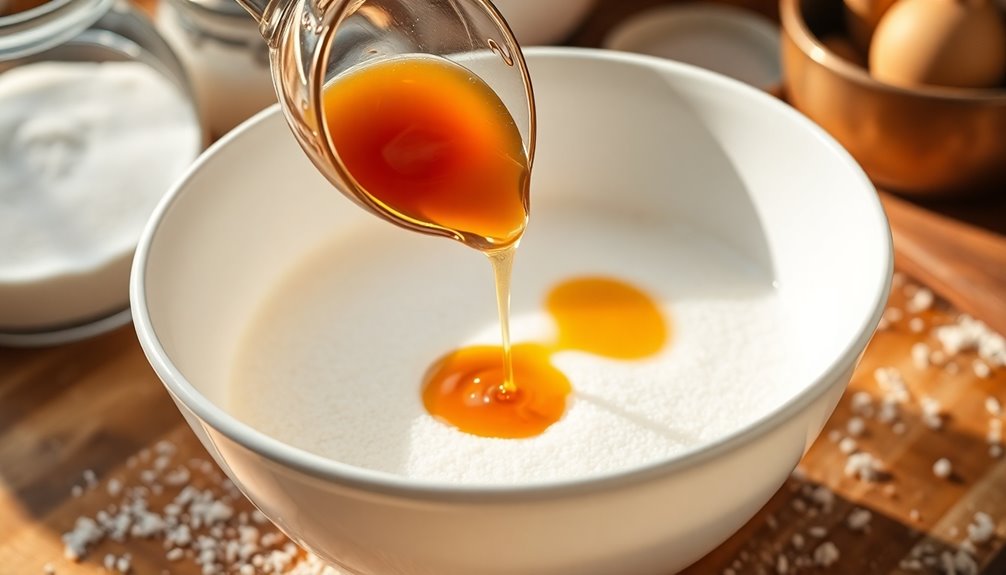
Once you've reached stiff peaks with your whipped aquafaba, it's time to gently add the vanilla extract.
Use about 1 teaspoon of pure vanilla extract for the best flavor. Stir it slowly into the mixture, ensuring it's well incorporated without deflating the whipped aquafaba.
This step is crucial for maintaining the structure and stability of your meringue, which needs to remain light and airy. Adding the vanilla extract at this stage enhances the overall flavor without compromising the meringue's integrity.
Step 5. Pipe Meringue Onto Baking Sheet
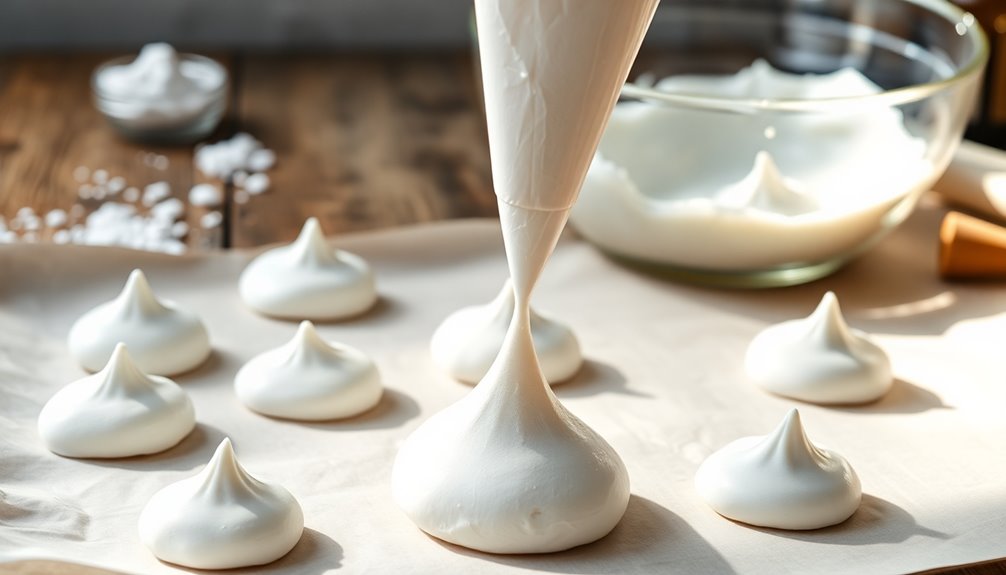
Now that your meringue mixture is ready, it's time to pipe it onto the baking sheet.
Begin by transferring the mixture, made with aquafaba and vanilla, into a piping bag fitted with a round tip.
Pipe quarter-sized rounds onto a baking sheet with parchment, ensuring they're evenly spaced for proper baking and air circulation.
Keep the piping tip close to the surface to maintain defined shapes and prevent spreading.
If you're unsure about your technique, practice on a separate sheet first.
For a fun twist, you can swirl in food coloring or sprinkle toppings like crushed nuts or cocoa powder on top of your vegan meringue cookies before baking.
Enjoy your delicious recipe!
Final Thoughts

While experimenting with aquafaba meringues, you'll discover that incorporating vanilla extract elevates the flavor and aroma, making each bite a delightful experience.
Using chickpea aquafaba, you'll create a light and airy texture when whisked with an electric mixer. The typical ratio of 3/4 cup of aquafaba, 1/2 cup of sugar, and 1 teaspoon of vanilla extract yields the best results.
Remember to add a splash of lemon juice for stability. When you pipe your meringue onto a baking tray with parchment, bake it at 200°F for about 1.5 hours to achieve that perfect crisp exterior.
Finally, let them cool completely before storage to keep them fresh and maintain their delightful crunch. Enjoy your delicious creations!
Frequently Asked Questions
Can You Make Meringue With Chickpea Water?
Yes, you can definitely make meringue with chickpea water, also known as aquafaba.
Just whip the liquid from canned chickpeas until it forms soft peaks. By adding cream of tartar and gradually incorporating sugar, you create a stable foam.
Once whipped, you can pipe it into shapes and bake at a low temperature until it's dry and crisp.
You'll be amazed at how light and airy the results turn out!
Are Aquafaba Meringues Good?
Imagine biting into a delicate cloud that melts in your mouth; that's what aquafaba meringues deliver. Yes, they're good!
You'll find their light, airy texture rivals traditional meringues, and the chickpea flavor disappears during baking. With a 4.81 satisfaction rating, you can't go wrong.
Plus, you can add your favorite flavors, making each batch uniquely yours. Just remember to store them properly, and they'll stay delightful for days.
What Is the Disadvantage of Aquafaba?
One disadvantage of aquafaba is its potential to carry a noticeable chickpea flavor before baking, which mightn't be appealing to you.
The stability can also vary, leading to inconsistent textures and volumes in your recipes.
Humidity can impact the final product, making it sticky and less crisp.
Plus, if you consume too much, you might experience digestive discomfort, limiting how much you can enjoy those aquafaba-based treats.
Can You Get Stiff Peaks With Aquafaba?
Absolutely, you can whip aquafaba into stiff peaks that rise like fluffy clouds!
With a stand mixer, beat it on high speed for about 5 to 10 minutes. Make sure your aquafaba's at room temperature and free from any oil; otherwise, it won't whip up properly.
Gradually adding sugar while whipping will help it stabilize, giving you that glossy, airy texture you're after.
Dive in and create a delightful treat!