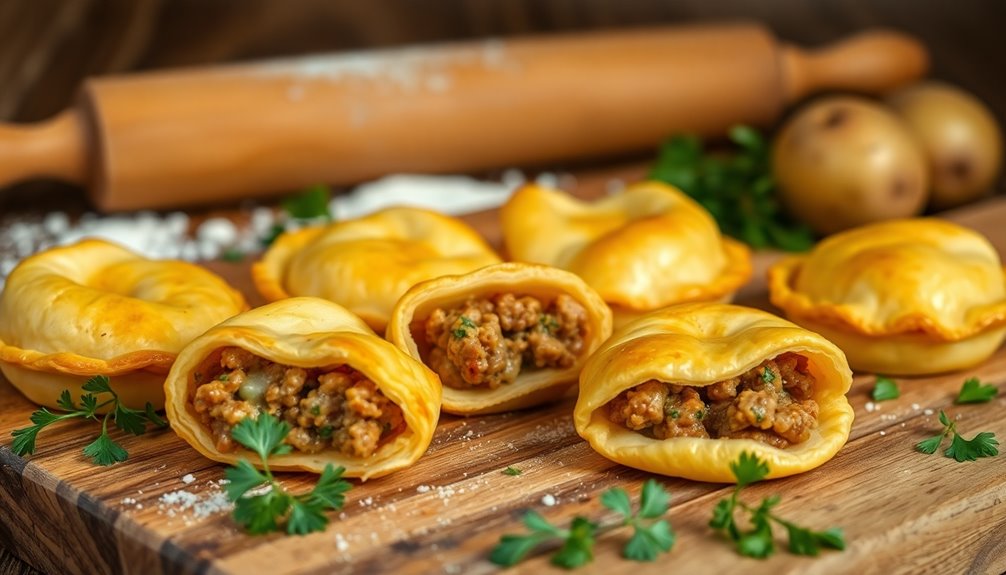

Mini pies made from minced potato dough filled with savory meat and melted cheese are a delicious twist on traditional hand pies. You'll appreciate how easy it is to prepare and customize these little treats. The crispy exterior coupled with a soft, flavorful filling makes them perfect for snacks or appetizers. Bake them until golden brown, and serve them with dumpling sauce for extra flavor. Want to discover even more tips and variations?
History

Mini pies, often called hand pies, have a rich history that dates back to ancient times, when various cultures relied on portable pastries for sustenance.
One of the most famous hand pies is the Cornish pasty, originally crafted by miners in Cornwall, England. These savory hand pies were designed for convenience, allowing workers to enjoy a hearty meal without utensils during breaks.
The Cornish pasty, a convenient meal for miners, exemplifies the rich tradition of savory hand pies.
By the 19th century, hand pies became popular as a fast food option among the working class in Britain. Across the globe, you'll find different variations, such as empanadas and samosas, showcasing the versatility of these portable pastries.
Today, fillings range from meats to cheeses, reflecting regional ingredients and tastes, like minced potato dough in some modern recipes. This evolution in recipes mirrors the energy-efficient models that have emerged, showcasing how traditional foods can adapt to modern preferences.
Recipe
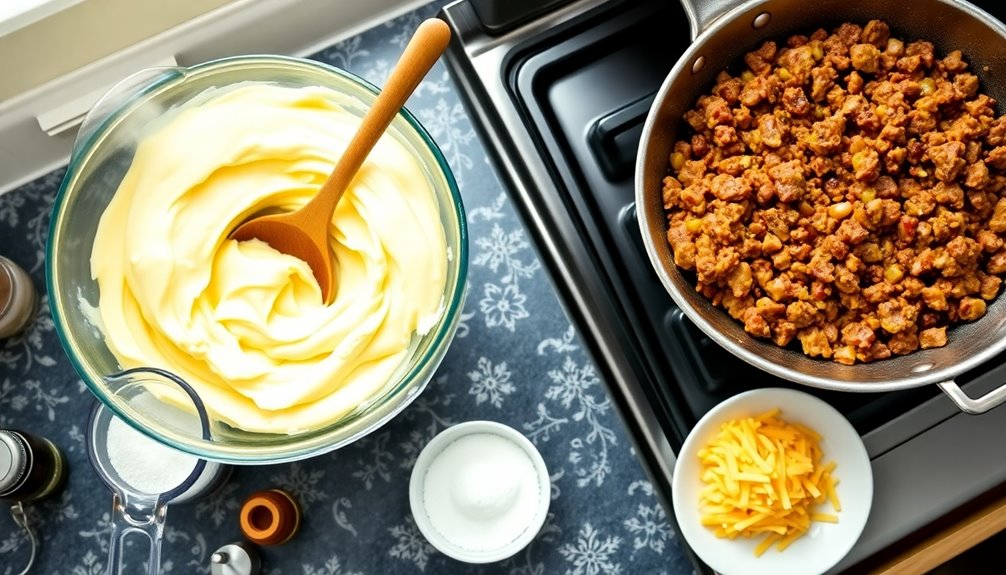
Preparing the dough is simple and requires just a few ingredients. Start by mashing boiled potatoes and mixing them with flour and seasonings to create a pliable yet firm base. This dough not only adds a unique flavor but also ensures that each pie is both crispy on the outside and soft on the inside after baking. Proper nutrition is essential during early development, supporting both cognitive growth and emotional well-being.
Once filled with the savory mixture and baked to golden perfection, these mini pies will quickly become a favorite in your household.
Ingredients:
- 2 cups boiled and mashed potatoes
- 1 cup all-purpose flour
- 1 teaspoon salt
- ½ teaspoon black pepper
- 1 pound ground beef
- 1 cup shredded cheese (cheddar or your choice)
- 1 teaspoon garlic powder
- 1 teaspoon onion powder
- 1 tablespoon olive oil
- Cooking spray or additional oil for greasing
Cooking Instructions:
In a large bowl, combine the mashed potatoes, flour, salt, and pepper to form the dough.
In a skillet, heat the olive oil over medium heat and cook the ground beef with garlic powder and onion powder until browned and cooked through. Remove from heat and mix in the shredded cheese until melted.
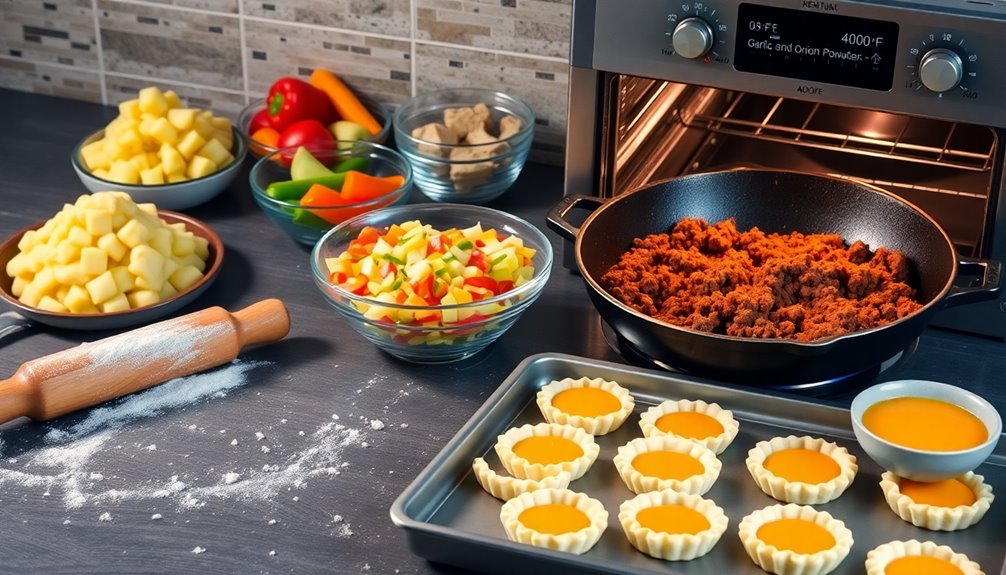
Preheat your oven to 400°F. Roll out the dough on a floured surface and cut it into circles. Place a spoonful of the meat and cheese mixture in the center of each dough circle, fold over, and seal the edges with a fork.
Arrange the mini pies on a greased baking sheet and bake for 18-20 minutes or until golden brown.
Extra Tips:
For added flavor, consider mixing in chopped vegetables like bell peppers or onions into the meat filling.
If you prefer a crispy crust, brush the tops of the mini pies with egg wash before baking.
These pies can also be prepared in advance; simply freeze them before baking, and when you're ready to enjoy, bake them straight from the freezer, adding a few extra minutes to the cooking time.
Enjoy experimenting with different fillings, such as chicken or vegetables, to suit your taste!
Cooking Steps
To make your mini pies, you'll start by preparing the minced meat mixture, then roll out the dough to create the perfect base.
Once you've filled each dough circle with the savory meat mixture, seal the edges securely to keep the goodness inside.
Finally, bake them until they're golden brown and crispy for a delicious treat! Additionally, serving your mini pies with a side of Cheesy Polenta can enhance the overall flavor experience.
Step 1. Prepare Minced Meat Mixture
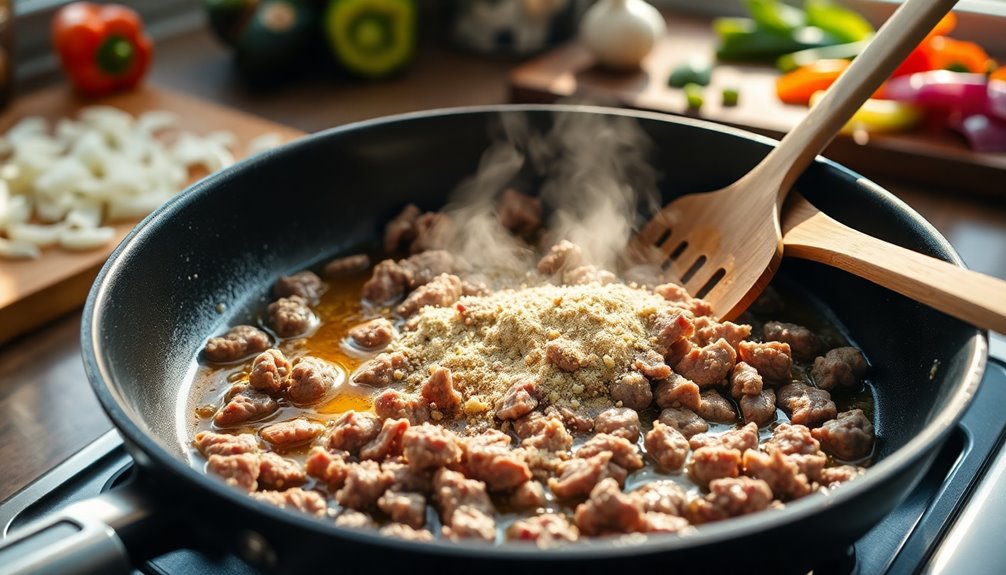
Start by cooking the minced meat in a skillet over medium heat, breaking it apart as it browns. This should take about 5-7 minutes until it's no longer pink.
Next, add finely chopped onions and garlic, cooking until softened and fragrant, which should take around 3-4 minutes.
Then, incorporate seasonings like ground cumin, smoked paprika, and seasoning salt, adjusting to your taste.
Stir in diced potatoes, or thawed frozen potatoes, allowing them to cook until tender and well-combined with the meat mixture, about 5-10 minutes.
Once the filling is complete, let it cool slightly before mixing in shredded cheese thoroughly, creating a cohesive filling that will perfectly complement your pastry dough for the mini pies. Additionally, ensure you have a solid emergency fund to manage any unexpected costs during your cooking process.
Step 2. Roll Out the Dough

Rolling out the dough is a crucial step to ensure your mini pies have the right texture. Start by lightly flouring your work surface to prevent sticking.
Roll out the minced potato dough until it's about 1/8 inch thick for optimal texture. Use a round cutter or a glass to cut out dough circles, aiming for 3 inches in diameter. Be gentle when handling the pastry to avoid toughness; chilling the dough for 30 minutes beforehand helps maintain its integrity.
As you work, keep the dough circles covered with a clean kitchen towel to prevent drying out. Once you're ready, you can place your filling in the center before folding the dough over and crimping the edges securely. Additionally, understanding emotional instability can enhance your experience in the kitchen, as managing stress levels can lead to a more enjoyable cooking process.
Step 3. Fill Dough With Meat Mixture
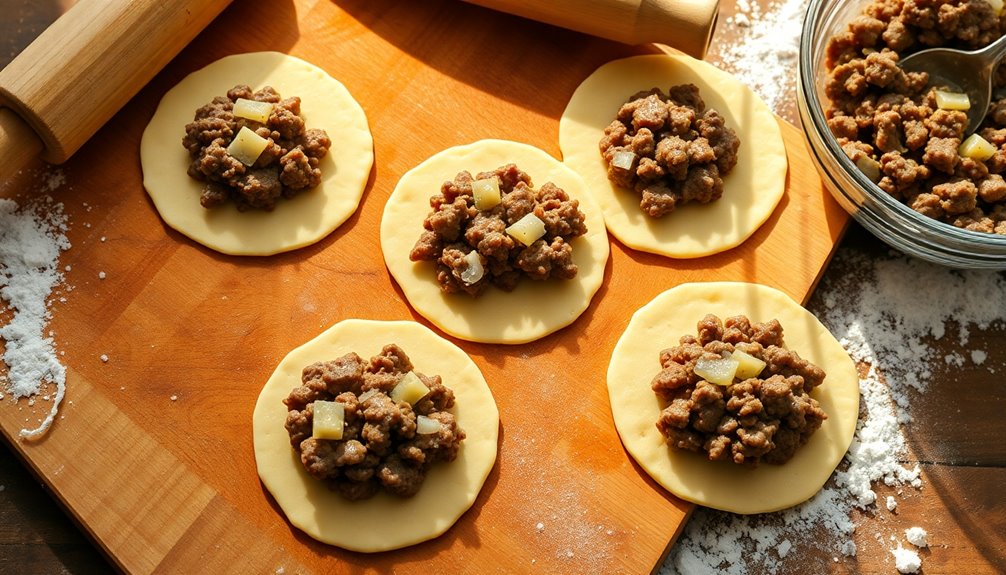
Spoon a generous amount of the meat mixture into the center of each dough circle, making sure to leave a small border around the edges for sealing. This filling should be enough to give your mini pies a hearty flavor without overflowing. If you want a good seal, lightly brush the edges of the dough with water or beaten egg. Once you've added the filling, carefully fold the dough over to create a half-moon shape. Press the edges together firmly to seal them. For an extra touch, use a fork to crimp the edges, ensuring they're tightly sealed to prevent any leakage during baking. This recipe is versatile and can be customized with various proteins and vegetables to suit your taste preferences. Now you're ready to move on to sealing those edges securely!
Step 4. Seal the Edges Securely

To ensure your mini pies are well-sealed, brush a small amount of water or beaten egg around the edges of the dough before folding it over the filling. This creates a better adhesive surface to help seal the edges securely.
After folding, use a fork to crimp the edges for added security and a decorative touch. Be mindful not to overstuff your homemade pie; excess filling can lead to bursting edges.
If you're using store-bought dough, roll it out slightly thinner to facilitate sealing. For extra assurance, chill the assembled mini pies in the refrigerator for 15-20 minutes before baking. This helps the dough firm up, improving the seal during cooking.
Additionally, consider adding toppings like whipped cream or sprinkles to enhance your mini pies. Enjoy your delicious creation!
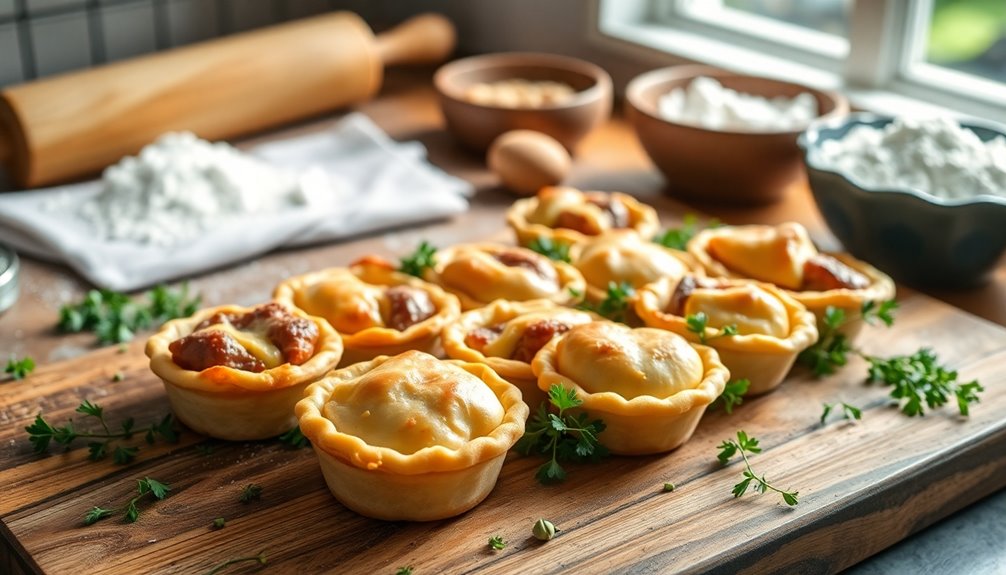
Step 5. Bake Until Golden Brown

Now that your mini pies are assembled and sealed, it's time to bake them for that perfect golden finish.
Preheat your oven to 400 degrees Fahrenheit. While the oven warms up, place the mini pies on a baking sheet.
Brush the tops with a beaten egg wash to give them a glossy look. Once the oven's ready, pop the baking sheet inside and bake for about 18 to 25 minutes.
Keep an eye on them; you want the pies to puff up and turn a beautiful golden brown. Check for doneness by ensuring they've a firm texture and a crisp crust.
For an extra boost of flavor, consider serving them with a side of dumpling sauce for dipping and added richness.
After baking, let them cool slightly on a wire rack to keep that delicious potato filling from turning soggy.
Final Thoughts
While mini pies with meat and cheese offer a delightful culinary experience, they're also incredibly versatile and practical. You can whip up these tasty treats using a savory filling of ground beef and cheese, creating a hearty option that satisfies.
Customize your mini pies with different meats, cheeses, and veggies, ensuring there's something for everyone at the table. They're perfect for portion control, making them ideal for quick lunches, snacks, or appetizers at gatherings.
Customize mini pies with a variety of meats, cheeses, and veggies for perfect portion control at any gathering.
Plus, if you're busy, you can freeze these mini pies before or after baking for easy meal prep. Whether you're entertaining guests or need a quick bite, these potato dough mini pies deliver on flavor and convenience every time.
Embrace global flavors by experimenting with various international fillings to elevate your mini pie experience!
Enjoy the endless possibilities!
Frequently Asked Questions
Can I Use Gluten-Free Flour for the Dough?
Yes, you can use gluten-free flour for the dough!
Just keep in mind that the texture might be different than traditional flour. You might need to adjust the liquid content or add a binding agent like xanthan gum to achieve the right consistency.
Experimenting with various gluten-free blends can also help you find the perfect mix.
Don't hesitate to try it out and see how it works for your recipe!
How Do I Store Leftover Mini Pies?
Storing leftover mini pies is like tucking a cozy blanket around a sleeping child.
First, let the pies cool completely, then wrap each one tightly in plastic wrap or foil to keep them fresh.
Place them in an airtight container, and they'll stay safe in the fridge for up to three days.
If you want to keep them longer, freeze them for up to three months.
Just reheat when you're ready to enjoy!
What Types of Cheese Work Best for Filling?
When it comes to cheese for filling, you've got plenty of delicious options!
Cheddar adds a sharp flavor that pairs well with many ingredients. Mozzarella brings a creamy texture and great meltability. Feta adds a tangy kick, while cream cheese can create a rich, smooth filling.
If you're feeling adventurous, try blue cheese for a bold taste. Experiment with combinations to find your perfect blend—you won't be disappointed!
Can I Freeze the Mini Pies Before Baking?
Yes, you can freeze the mini pies before baking!
It's a great way to prepare meals in advance. Just make sure to wrap them tightly in plastic wrap or foil to prevent freezer burn.
When you're ready to bake, you'll want to add a few extra minutes to the cooking time.
You'll enjoy having a delicious homemade treat ready whenever you need it, without the hassle of starting from scratch!
Are There Vegetarian Alternatives for the Meat Filling?
Imagine a vibrant garden bursting with fresh vegetables; that's your canvas for a delicious vegetarian filling.
You can swap out meat for ingredients like sautéed mushrooms, lentils, or a medley of roasted veggies.
Spices and herbs can transform these ingredients into a savory delight, while cheese or plant-based alternatives add creaminess.
With a little creativity, you'll craft a filling that's just as satisfying and flavorful as any meat version.
Enjoy experimenting!
Conclusion
As you take a bite of your mini pie, the warm, flaky crust gives way to a delicious blend of seasoned meat and gooey cheese, each morsel bursting with flavor. You can't help but wonder how something so simple can evoke such comfort. Just when you think you've savored every layer, the surprising hint of herbs dances on your palate, leaving you craving more. What will your next filling be? The possibilities are endless, and the adventure continues!